In
this article I demonstrate how to create a standalone .rdlc report and
how to access it via C# code only. I also demonstrate how to set up the
report fields for the report designer using a very simple technique
based on stored procedures. Additionally I also demonstrate how to map a
dataset consisting of two tables (ds.Tables[0] and ds.Tables[1] - a 3
& 4 column table respectively) to the standalone report. I also
cover the setting up of a simple Test Harness C# project in Visual
Studio 2005 to test your standalone .rdlc report.
This
article is deliberately written with the beginner in mind, hence it is
rather lengthy as I try to explain in detail what to do, so I apologise
if you find it slow-going. It is also for those who have a particular
need to create standalone .rdlc reports that are unbound at design time
but have their data added at runtime. Many examples I have seem to
assume that you will be running your report against the same data source
that the report was originally designed against. For me this was not
the case and I needed an alternative, hence the procedure outlined in
this article. I hope what follows will be of some help to you.
Acknowledgements
I
would like to thank Justin Saraceno whose article The ReportViewer
control, a local SSRS 2005 report, and data from a Web Service got me
going in the right direction. I use the same type of code approach that
he uses. His article can be found on the http://www.c-sharpcorner.com web-site.
Requirements
My .rdlc reports had to be able to do the following:
- Be
100% standalone and capable of being accessed in code only i.e. there
should be no need to add the .rdlc file to your Visual Studio project.
- Some
of our current production report queries run Stored Procedures that
have multiple SELECT statements in them. These SPROCS return a single
dataset containing multiple tables. If ds is our dataset, then we get
back ds.Tables[0] ds.Tables[1], ds.Tables[2] etc. These tables had to be
able to be wired into the report in code only.
By
the way, with the following technique you can also wire in Tables from
different data sources as well. So if I had 2 datasets ds1 & ds2,
then you can wire in ds1.Tables[0] and ds2.Tables[0]. The ds1 object
might be a SQL Server query result. ds2 might be a mainframe query
result etc. The report viewer control really doesnt care where these
data tables are coming from they are all just tables as far as the
viewer control is concerned.
Prerequisites
To use the following technique that I am about to describe you should make sure you meet the following prerequisites:
- Visual Studio 2005 with SSRS on your local pc.
- SQL Server 2005 Management Studio (with NorthwindCS or similar database) installed on your local pc.
- Sufficient
permissions within SQL Server 2005 Management Studio to CREATE and DROP
Stored Procedures from the NorthwindCS (or similar) database.
We
are using NorthwindCS here just for simplicity because it gets
installed when you install SQL Server 2005 Management Studio. We just
want somewhere to park our Stored Procedures that we are going to create
soon. The Sprocs we create actually have nothing to do with the
NorthwindCS database In a real Development environment you would
probably want to store the Sprocs in a meaningful location.
Values for this example
- Our standalone .rdlc file will be called MyTestReport.rdlc
- It will reside here C:\Reports\MyTestReport.rdlc for standalone testing.
- It will require 2 datasources to be added to it called Reportdata_Table0 consisting of 3 columns
(ID, DESCRIPTION and QUANTITY) and Reportdata_Table1 consisting of 4 columns
(CUSTOMER_ID, NAME, ADDRESS and POSTAL_CODE).
- Our design version .rdlc file will be called TestReport.rdlc
The report friendly name will be "TESTREPORT" here is a summary of the datasource/dataset mapping.
Report Datasource name
|
Data coming from dataset
|
Table type
|
Reportdata_Table0
|
dsMyDataSet.Tables[0]
|
3 column table
|
Reportdata_Table1
|
dsMyDataSet.Tables[1]
|
4 column table
|
We
will hard-code some test data into the test harness (by building a 2
tabled dataset in code) so that there is something to show on the report
itself, but in your own application you can derive the data from
anywhere (a query, or an .xml file, web-service call etc.)
The first step though is to create a simple test harness.
Create a simple TestHarness application
Our test harness will be where we design our .rdlc reports and test them also.
The
basic approach will be to add a .rdlc file to our Visual Studio test
harness project called TestReport.rdlc, merely so that we can get access
to the designer, but when the report is finished it will be copied from
the Visual Studio project location to the C:\Reports folder and then
renamed to MyTestReport.rdlc
to prove absolutely that we are dealing with a standalone file. The
project has no knowledge of a file called MyTestReport.rdlc and this
file is accessed in code only.
step 1 create a test harness
For this we want the following
- A standard C# Windows application consisting of a single dialog.
- One SSRS report viewer control (reportViewer1).
- One Exit button (btnExit).
- One View Report button (btnViewReport).
- One combo drop down control (cmbReport).
- A label for the combo (Report).
Here is what mine looks like
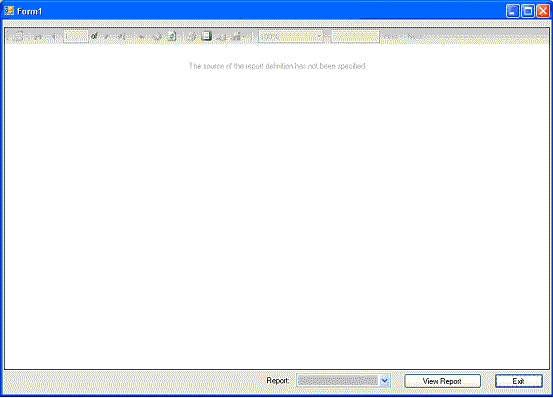
Anchor the buttons etc. to the Bottom and Right. Anchor the Report viewer to Top, Bottom, Left and Right.
The code behind the Exit button click event is:
private void btnExit_Click(object sender, EventArgs e)
{
this.Close();
}
Lets say our new report user friendly name will be "TESTREPORT". Therefore in the Form_Load event for this dialog put the following:
this.cmbReport.Items.Add("TESTREPORT");
As
you design more reports keep adding them to the combo in the Form_Load
event so you can easily select the report you want to test.
I found I needed the following using directives:
using System.Data.SqlClient;
using System.Xml;
using System.Xml.Serialization;
using System.Data.OleDb;
using System.IO;
As
I have been running SQL and Mainframe queries in my test harness.
Depending on what you will be designing you may not need all of them.
For this walk through you do not need any of them.
Add the following module variable dsMyDataSet this will be our ds.Tables[0] and ds.Tables[1] object I alluded to earlier:
public partial class Form1 : Form
{
//module scope dataset variable
DataSet dsMyDataSet = new DataSet();
Now in the click event for btnViewReport button add the following code:
private void btnViewReport_Click(object sender, EventArgs e)
{
//reset the report viewer
this.reportViewer1.Reset();
//set processing to local mode
this.reportViewer1.ProcessingMode = Microsoft.Reporting.WinForms.ProcessingMode.Local;
//check which report to test
if (this.cmbReport.Text.Trim() == "TESTREPORT")
{
//load .rdlc file and add a datasource
this.reportViewer1.LocalReport.ReportPath = @"C:\Reports\MyTestReport.rdlc";
//loop through each table in our dataset
for (int i=0; i<this.dsMyDataSet.Tables.Count; i++)
{
this.reportViewer1.LocalReport.DataSources.Add(this.GetMyDataTable(i));
}
}
//refresh viewer with above settings
this.reportViewer1.RefreshReport();
}
Now we need 1 function called GetMyDataTable(int i)) and here is what it looks like:
private Microsoft.Reporting.WinForms.ReportDataSource GetMyDataTable(int i)
{
//form the datasource name - you need a naming convention for this to work
string sDataSourceName = "Reportdata_Table" + i.ToString().Trim();
//the line above will generate datasource names of "Reportdata_Table0" and
//"Reportdata_Table1" for our 2 tabled dataset - we just need to ensure our .rdlc
//report has been designed to receive 2 datasources with these same names, and that
//the columns match up pecisely one-to-one for each table.
//return the relevant dataset table
return new Microsoft.Reporting.WinForms.ReportDataSource(sDataSourceName,
this.dsMyDataSet.Tables[i]);
}
Create a function that sets up the 2-tabled dataset using our module variable dsMyDataSet. Call this function from the Form_Load event so that dsMyDataSet is pre-populated with some data ready for display.
This is what I did: Note the column names, you will see them later when we do the Stored Procedures.
private void SetupDataSet()
{
//create 1st DataTable to hold some report data
System.Data.DataTable myTable0 = new DataTable("myTable0");
System.Data.DataColumn column;
System.Data.DataRow row;
//create 3 columns
column = new DataColumn();
column.DataType = System.Type.GetType("System.String");
column.ColumnName = "ID";
column.ReadOnly = true;
column.Unique = true;
// Add the Column to the DataColumnCollection.
myTable0.Columns.Add(column);
column = new DataColumn();
column.DataType = System.Type.GetType("System.String");
column.ColumnName = "DESCRIPTION";
column.ReadOnly = true;
column.Unique = true;
// Add the Column to the DataColumnCollection.
myTable0.Columns.Add(column);
column = new DataColumn();
column.DataType = System.Type.GetType("System.String");
column.ColumnName = "QUANTITY";
column.ReadOnly = true;
column.Unique = true;
// Add the Column to the DataColumnCollection.
myTable0.Columns.Add(column);
//add a row of data
row = myTable0.NewRow();
row["ID"] = "1234567890";
row["DESCRIPTION"] = "Rickenbacker Electric Guitar";
row["QUANTITY"] = "5";
//add the row of data to the table
myTable0.Rows.Add(row);
//and a second row
row = myTable0.NewRow();
row["ID"] = "777745632";
row["DESCRIPTION"] = "Gibson Electric Guitar";
row["QUANTITY"] = "7";
//add the row of data to the table
myTable0.Rows.Add(row);
//add myTable0 to global dataset
this.dsMyDataSet.Tables.Add(myTable0);//dsMyDataSet.Tables[0] object;
//create 2nd DataTable to hold some report data
System.Data.DataTable myTable1 = new DataTable("myTable1");
//create 4 columns
column = new DataColumn();
column.DataType = System.Type.GetType("System.String");
column.ColumnName = "CUSTOMER_ID";
column.ReadOnly = true;
column.Unique = true;
// Add the Column to the DataColumnCollection.
myTable1.Columns.Add(column);
column = new DataColumn();
column.DataType = System.Type.GetType("System.String");
column.ColumnName = "NAME";
column.ReadOnly = true;
column.Unique = true;
// Add the Column to the DataColumnCollection.
myTable1.Columns.Add(column);
column = new DataColumn();
column.DataType = System.Type.GetType("System.String");
column.ColumnName = "ADDRESS";
column.ReadOnly = true;
column.Unique = true;
// Add the Column to the DataColumnCollection.
myTable1.Columns.Add(column);
column = new DataColumn();
column.DataType = System.Type.GetType("System.String");
column.ColumnName = "POSTAL_CODE";
column.ReadOnly = true;
column.Unique = true;
// Add the Column to the DataColumnCollection.
myTable1.Columns.Add(column);
//add a row of data
row = myTable1.NewRow();
row["CUSTOMER_ID"] = "56790";
row["NAME"] = "John Lennon";
row["ADDRESS"] = "Strawberry Fields , Liverpool , England";
row["POSTAL_CODE"] = "NWE232";
//add the row of data to the table
myTable1.Rows.Add(row);
//add a row of data
row = myTable1.NewRow();
row["CUSTOMER_ID"] = "44982";
row["NAME"] = "George Harrison";
row["ADDRESS"] = "22 Penny Lane , Liverpool , England";
row["POSTAL_CODE"] = "NWE231";
//add the row of data to the table
myTable1.Rows.Add(row);
//add myTable1 to global dataset
this.dsMyDataSet.Tables.Add(myTable1);//dsMyDataSet.Tables[1] object;
}
Do not forget to call the above function from your Form_Load event, similar to:
private void Form1_Load(object sender, EventArgs e)
{
this.cmbReport.Items.Add("TESTREPORT");
this.SetupDataSet();
At this point the project should build.
We have now got our Dataset that contains 2 tables, i.e. we have created dsMyDataSet.Tables[0] and dsMyDataSet.Tables[1],
a 3 and 4 column table respectively with the column names as shown in
the above code snippet and a couple of rows of data for each one.
If you look at the return statement in the above GetMyDataTable(int i) function you can see that our report will have to be designed to expect 2 data sources to be added to it called ReportdataTable0 and ReportdataTable1,
and additionally these data sources have to have 3 and 4 columns
defined within them respectively with identical names for the columns as
we are using in the dataset dsMyDataSet.
Next
step is to design the actual report, and the starting point for this is
to get the report fields to show up in the Data Sources pane in Visual
Studio so that you can drag and drop them onto the report designer
surface.
REPORT DESIGN
Create the report input fields via Stored Procedures
This
is where we make use of the NorthwindCS database on your locally
installed instance of SQL Server 2005. Here we just want to use a couple
of stored procedures to define the report input fields. There is no
intention to use the stored procedures at runtime to provide data. At
runtime the data will come from somewhere else (in this case a hard
coded Dataset in the app.), but in your own application the dataset can
be from anywhere.
Make sure your local instance of sql server 2005 is started. Check the icon in the system tray.
Create
2 Stored Procedures in Notepad ready to copy across to SQL Server 2005
that look like this (or type them directly into SQL Server 2005 query
window after selecting NorthwindCS).
Sproc #1
USE NorthwindCS
GO
/*------------------------------------------------------------------*
This stored procedure provides a starting point for the
design of a Test SSRS Report.
*-------------------------------------------------------------------*/
CREATE PROC up_SSRS_TestReport_InputFields0
AS
SELECT DISTINCT
'1' AS ID,
'2' AS DESCRIPTION,
'3' AS QUANTITY
Sproc #2
USE NorthwindCS
GO
/*------------------------------------------------------------------*
This stored procedure provides a starting point for the
design of a Test SSRS Report.
*-------------------------------------------------------------------*/
CREATE PROC up_SSRS_TestReport_InputFields1
AS
SELECT DISTINCT
'1' AS CUSTOMER_ID,
'2' AS NAME,
'3' AS ADDRESS,
'4' AS POSTAL_CODE
Note that it is the column names that are important here, not the data. Note also that the column names match exactly to the column names that we added to our datatables earlier (dsMyDataSet).
Step 1
Go into SQL Server 2005, connect to the local server instance and browse to NorthwindCS and select New Query. Run each of the above SPROC code as a query, then refresh to see your new Stored Procedures in the NorthwindCS database.
Step 2
In
Visual Studio 2005 with your Test Harness app. open make sure you can
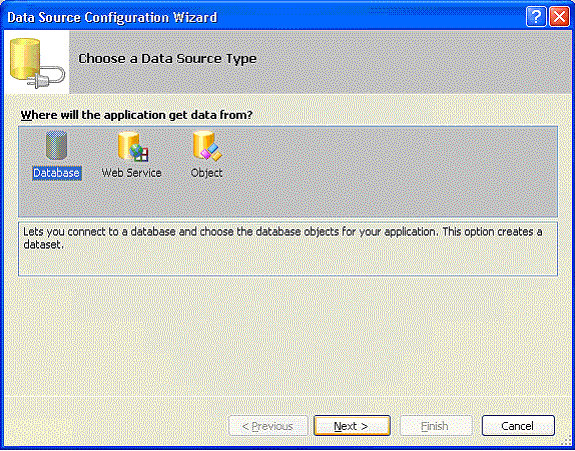
see the Data Sources pane. Single right-click in this pane and select Add New Data Source. This starts the Wizard.
Step 3
For the question "Where will the application get data from?" leave the default setting of Database and click Next.
Step 4
For the question "Which data connection should your application use to connect to the database?" click on New Connection.
If
you installed SQL Server 2005 locally then your own pc is the server.
Type in your computer name into the Server name: field (this saves time
there could be many servers on your network. So avoid browsing for
them). I selected to use Windows authentication.
The
section at the bottom of the Add connection dialog should now be
enabled, where you can select or enter a database name. Use the drop
down control to see the databases contained in your local instance of
SQL Server 2005. Select NorthwindCS from the drop-down list.
Click on Test connection to make sure its working. Click OK to continue.
This is what my connection string looks like
Data Source=FNOA1281; Initial Catalog = NorthwindCS; Integrated Security=True
For the question "Save the Connection String to the Application Configuration File" just leave the default and click Next.
Step 5
Click Next. You will see a message briefly that says "Retrieving database information" followed by a dialog that allows you to Choose Your Database Objects. This list allows you to choose from Tables, Views, Stored Procedures and Functions. In our case we will be selecting the Stored Procedures we created earlier.
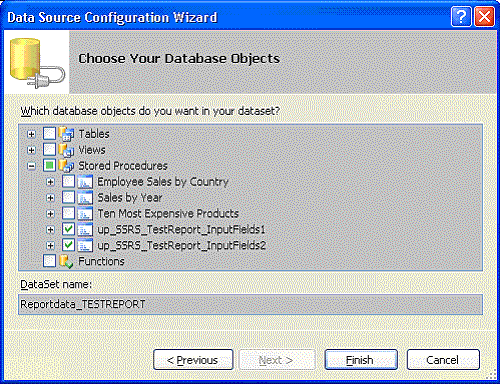
So expand the Stored Procedures section and put a tick against up_SSRS_TestReport_InputFields1 and up_SSRS_TestReport_InputFields2. This is a great feature of SSRS because you can lump related SPROCS together under a single category.
Step 6
In
the DataSet name field at the bottom of the dialog change the default
name that SSRS provides to something more meaningful like ReportdataTESTREPORT.
It should look like this
Click Finish to close the Wizard.
You should now have a datasource category called ReportdataTESTREPORT and this is what it should look like in the Data Sources pane
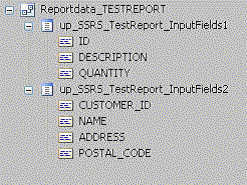
From this information SSRS will automatically form 2 Project data sources called:
Reportdata_TESTREPORT_up_SSRS_TestReport_InputFields1
and
Reportdata_TESTREPORT_up_SSRS_TestReport_InputFields2
i.e. the names get mangled together so they are unique. You will see them later in the Report Data Sources dialog.
Now
we have our report fields courtesy of the NorthwindCS database and a
couple of simple SPROCS. I knew that database would come in handy one
day.
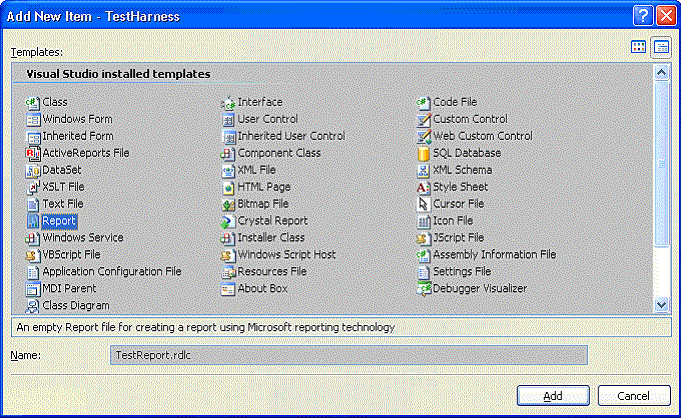
Add a new .rdlc file to your Visual Studio Project
Now we need to add a .rdlc report to the project so we can design our report.
In the Solution Explorer window single right-click the project name and select Add /New Item.From the templates displayed select Report and change the name at the bottom to TestReport.rdlc.
Click Add. It now appears in the Solution Explorer pane and a blank design page is presented to you.
Open
the SSRS toolbox pane and drag and drop 2 table controls onto the
report surface. These will be called table1 and table2 by default. Add
an extra column to the 2nd table. We want a 3 and a 4 column table to match our 3 and 4 column data tables created earlier.
Put
any text you like in the Header fields of each table control (something
descriptive). Add any bordering to the tables according to individual
preference.
Open
the Data Sources pane again and expand the ReportdataTESTREPORT project
data source node you created earlier. Expand the SPROC nodes as well.
Do the following drag and drops
From up_SSRS_TestReport_InputFields1 Sproc
Drag & drop: ID table1/Detail (1st column)
Drag & drop: DESCRIPTION table1/Detail (2nd column)
Drag & drop: QUANTITY table1/Detail (3rd column)
From up_SSRS_TestReport_InputFields2 Sproc
Drag & drop: CUSTOMER_ID table2/Detail (1st column)
Drag & drop: NAME table2/Detail (2nd column)
Drag & drop: ADDRESS table2/Detail (3rd column)
Drag & drop: POSTAL_CODE table2/Detail (4th column)
We are almost there now
Remember
that we need 2 report datasources called Reportdata_Table0 and
Reportdata_Table1. The next section explains how to do this
Setup the Report Data Sources with the names you want
As
soon as you start dragging and dropping the fields as described above,
SSRS will allocate the following DataSet names for each table in your
report
Report Table Name
|
DataSetName property (as allocated by SSRS)
|
table1
|
Reportdata_TESTREPORT_up_SSRS_TestReport_InputFields1
|
table2
|
Reportdata_TESTREPORT_up_SSRS_TestReport_InputFields2
|
Check these values in the DataSetName property for each table on your report.
If
we wanted to, at this point, we could use these DataSetName values (as
they are shown in the table above). We did just have to change our GetMyDataTable(int i) function to have the following line
//create the Datasource name
sDataSourceName = "Reportdata_TESTREPORT_up_SSRS_TestReport_InputFields" + (i+1).ToString().Trim();
But that is a bit of a mouthful. So lets make it something nicer.
STEPS to renaming a report data source
-
Make sure the report designer is open with your new report showing in the designer.
-
From the menus select Reportà Data Sources.This opens the Report Data Sources dialog and it should look something like this
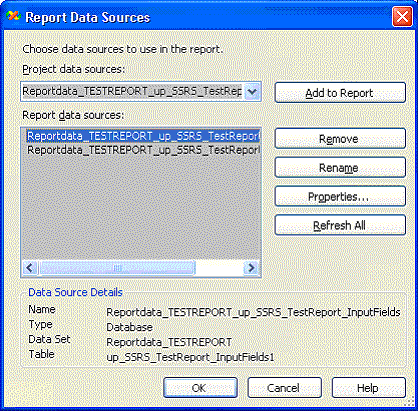
Note the upper control is for Project data sources and the lower control is for Report data sources.
Because
we have used fields from 2 data sources when we did the dragging and
dropping earlier, SSRS has automatically added these 2 datasources to
the above dialog. To change the name of the Report data sources just
click on the first one in the list and click rename. Type in ReportdataTable0. Do the same for the second one but call it ReportdataTable1.
Now it should look like
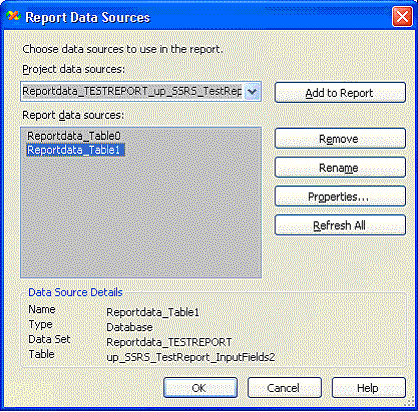
Click
OK to dismiss the dialog, then Save your project so the new names
stick. Its worth going back into this dialog to check that your new
names have stuck. On some occasions when I have gone back in the names
have still been set to their original values.
There is one final thing to do
Even
though we have changed the name of the Report data sources to something
that we want, this has only happened on the Visual Studio side and the
report itself still thinks it is working with the original
names that SSRS allocated. You can see this if you select one of your
tables in the designer (table1 say) and look at its DataSetName
property.
Table1 property

So
the final thing to do is to select the pulldown control in this
property and select ReportdataTable0 for table1 and ReportdataTable1 for
table2 in your report.
Table1 property
Table2 property
Now Visual Studio and your SSRS report agree on the name of the DataSetName.
The
lesson here is that if you change the name of a Report data source you
then have to visit every control in your report that makes use of that
data source and check the DataSetName property.
Implement the standalone .rdlc file
Browse
to where Visual Studio has your TestReport.rdlc file and copy it to
C:\Reports folder. Then rename it to MyTestReport.rdlc (you can leave
the name the same really if you want, just make sure that whatever name
you give it here, you use the same name when you access the file in
code).
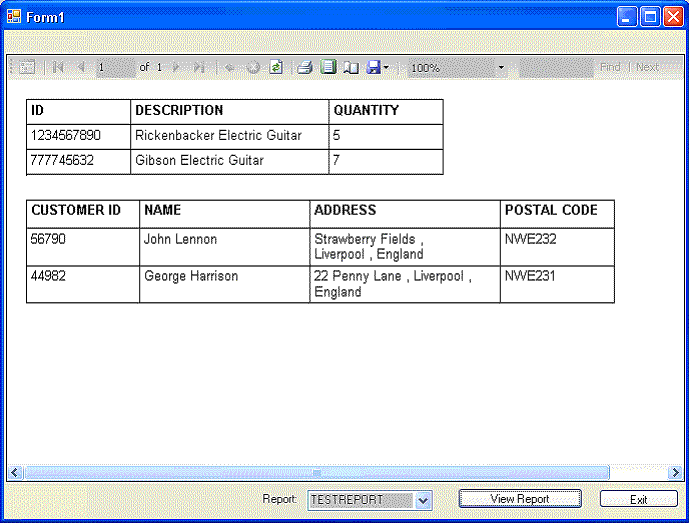
Run the application and select TESTREPORT from the combo pull down, then click View Report.
You should see the final result similar to this
If
you wanted to you could now go back into your project and delete all of
the data sources from the Data Sources pane by deleting the
corresponding .xsd file (Reportdata_TESTREPORT.xsd) from the Solution
Explorer pane, and your MyTestReport.rdlc file will still work.
You
could also delete the TestReport.rdlc design version of the file from
the Solution Explorer pane if you wanted to and MyTestReport.rdlc will
still work correctly i.e. we have created a 100% standalone report that
can be wired up to any data source provided that data source supplies
the components that the report expects (which in this case is one data
source called Reportdata_Table0 consisting of a 3 columned table (ID,
DESCRIPTION, QUANTITY) and a second data source called Reportdata_Table1
consisting of a 4 columned table
(CUSTOMER_ID,NAME,ADDRESS,POSTAL_CODE)).
Appendix I
Here is the full listing of my Form1.cs file just in case you get lost
using System;
using System.Collections.Generic;
using System.ComponentModel;
using System.Data;
using System.Drawing;
using System.Text;
using System.Windows.Forms;
using System.Data.SqlClient;
using System.Xml;
using System.Xml.Serialization;
using System.Data.OleDb;
using System.IO;
namespace TestHarness
{
public partial class Form1 : Form
{
//module scope dataset variable
DataSet dsMyDataSet = new DataSet();
public Form1()
{
InitializeComponent();
}
private void Form1_Load(object sender, EventArgs e)
{
this.cmbReport.Items.Add("TESTREPORT");
this.SetupDataSet();
this.reportViewer1.RefreshReport();
}
private void btnExit_Click(object sender, EventArgs e)
{
this.Close();
}
private void btnViewreport_Click(object sender, EventArgs e)
{
//reset the report viewer
this.reportViewer1.Reset();
//set processing to local mode
this.reportViewer1.ProcessingMode =
microsoft.Reporting.WinForms.ProcessingMode.Local;
//check which report to test
if (this.cmbReport.Text.Trim() == "TESTREPORT")
{
//load .rdlc file and add a datasource
this.reportViewer1.LocalReport.ReportPath :\Reports\MyTestReport.rdlc";
//loop through each table in our dataset
for (int i = 0; i < this.dsMyDataSet.Tables.Count; i++)
{
this.reportViewer1.LocalReport.DataSources.Add(this.GetMyDataTable
}
}
//refresh viewer with above settings
this.reportViewer1.RefreshReport();
}
private Microsoft.Reporting.WinForms.ReportDataSource GetMyDataTable(int i)
{
//form the datasource name - you need a naming convention for this to work
string sDataSourceName = "Reportdata_Table" + i.ToString().Trim();
//the line above will generate datasource names of "Reportdata_Table0" and
//"Reportdata_Table1" for our 2 tabled dataset - we just need to ensure
our .rdlc
//report has been designed to receive 2 datasources with these same
names and that
//the columns match up pecisely one-to-one for each table.
//return the relevant dataset table
return new Microsoft.Reporting.WinForms.ReportDataSourceDataSourceName,
this.dsMyDataSet.Tables[i]);
}
private void SetupDataSet()
{
//create 1st DataTable to hold some report data
System.Data.DataTable myTable0 = new DataTable("myTable0");
System.Data.DataColumn column;
System.Data.DataRow row;
//create 3 columns
column = new DataColumn();
column.DataType = System.Type.GetType("System.String");
column.ColumnName = "ID";
column.ReadOnly = true;
column.Unique = true;
// Add the Column to the DataColumnCollection.
myTable0.Columns.Add(column);
column = new DataColumn();
column.DataType = System.Type.GetType("System.String");
column.ColumnName = "DESCRIPTION";
column.ReadOnly = true;
column.Unique = true;
// Add the Column to the DataColumnCollection.
myTable0.Columns.Add(column);
column = new DataColumn();
column.DataType = System.Type.GetType("System.String");
column.ColumnName = "QUANTITY";
column.ReadOnly = true;
column.Unique = true;
// Add the Column to the DataColumnCollection.
myTable0.Columns.Add(column);
//add a row of data
row = myTable0.NewRow();
row["ID"] = "1234567890";
row["DESCRIPTION"] = "Rickenbacker Electric Guitar";
row["QUANTITY"] = "5";
//add the row of data to the table
myTable0.Rows.Add(row);
//and a second row
row = myTable0.NewRow();
row["ID"] = "777745632";
row["DESCRIPTION"] = "Gibson Electric Guitar";
row["QUANTITY"] = "7";
//add the row of data to the table
myTable0.Rows.Add(row);
//add myTable0 to global dataset
this.dsMyDataSet.Tables.Add(myTable0);//dsMyDataSet.Tables[0] object;
//create 2nd DataTable to hold some report data
System.Data.DataTable myTable1 = new DataTable("myTable1");
//create 4 columns
column = new DataColumn();
column.DataType = System.Type.GetType("System.String");
column.ColumnName = "CUSTOMER_ID";
column.ReadOnly = true;
column.Unique = true;
// Add the Column to the DataColumnCollection.
myTable1.Columns.Add(column);
column = new DataColumn();
column.DataType = System.Type.GetType("System.String");
column.ColumnName = "NAME";
column.ReadOnly = true;
column.Unique = true;
// Add the Column to the DataColumnCollection.
myTable1.Columns.Add(column);
column = new DataColumn();
column.DataType = System.Type.GetType("System.String");
column.ColumnName = "ADDRESS";
column.ReadOnly = true;
column.Unique = true;
// Add the Column to the DataColumnCollection.
myTable1.Columns.Add(column);
column = new DataColumn();
column.DataType = System.Type.GetType("System.String");
column.ColumnName = "POSTAL_CODE";
column.ReadOnly = true;
column.Unique = true;
// Add the Column to the DataColumnCollection.
myTable1.Columns.Add(column);
//add a row of data
row = myTable1.NewRow();
row["CUSTOMER_ID"] = "56790";
row["NAME"] = "John Lennon";
row["ADDRESS"] = "Strawberry Fields , Liverpool , England";
row["POSTAL_CODE"] = "NWE232";
//add the row of data to the table
myTable1.Rows.Add(row);
//add a row of data
row = myTable1.NewRow();
row["CUSTOMER_ID"] = "44982";
row["NAME"] = "George Harrison";
row["ADDRESS"] = "22 Penny Lane , Liverpool , England";
row["POSTAL_CODE"] = "NWE231";
//add the row of data to the table
myTable1.Rows.Add(row);
//add myTable1 to global dataset
this.dsMyDataSet.Tables.Add(myTable1);//dsMyDataSet.Tables[1] object;
}
}
}Appendix II
Here are two more examples of GetMyData() type functions that I have used recently: the 1st one runs a SQL query against a remote server and the 2nd one runs a mainframe DB2 query.
private Microsoft.Reporting.WinForms.ReportDataSource GetMyDataEAR005()
{
//TEST Reporting server
string strConn = "server=EDSQL022\\SQL07;database=MgtReporting;Integrated
Security=SSPI;";
string sQuery = "SELECT DISTINCT AL1.ReportName AS Report_Name,
reportMnemonic AS Report_Mnemonic, AL1.ReportType AS Report_Type,
AL1.Active, +" AL2.ReportGroup AS Report_Group, AL4.ADRole AS AD_Role,L3.BizArea
Business_Area" +" FROM dbo.vwFullReportList AS AL1 LEFT OUTER JOIN " + "
dbo.vwReportGroupMap AS AL2 ON AL1.ReportID = AL2.ReportID AND AL1.ReportType
= AL2.ReportType LEFT OUTER JOIN" + " dbo.vwReportBizMap AS AL3 ON L3.ReportID
= AL1.ReportID AND AL3.ReportType = AL1.ReportType LEFT OUTER JOIN" + "
dbo.vwReportRoleMap AS AL4 ON AL4.ReportID = AL1.ReportID AND
AL4.ReportType AL1.ReportType" + " ORDER BY Report_Mnemonic,AD_Role";
DataSet ds = new DataSet("ReportDataSet");
SqlConnection cn = new SqlConnection(strConn);
cn.Open();
SqlDataAdapter da = new SqlDataAdapter(sQuery, cn);
da.Fill(ds);
cn.Close();
return new Microsoft.Reporting.WinForms.ReportDataSource("ReportList_EAR005",
ds.Tables[0]);
}
//=======================================================================
private Microsoft.Reporting.WinForms.ReportDataSource GetMyDataCWCR004()
{
string strConn = "Provider=DB2OLEDB;Data Source=DBT1;Persist Security
Info=True;Password=xxxxxxx;User ID=my_id;Initial Catalog=DBT1;Network Transport
Library=TCPIP;Network Address=fbrukdev.network;Network Port=5025;Package
Collection=HIS2004;Default Schema=MIS";
string sQuery = "SELECT DISTINCT AL1.ESA_CODE, AL1.ESA_DESCRIPTION,
AL2.FUTURE_MTH_NUM, " +" CASE WHEN AL1.FUTURE_MTH_NUM = 0 THEN 'Past'
ELSE 'Future' END AS TIMESPAN, " + " AL1.YR_MONTH, AL1.TOTAL_CNT,
AL1.EXTRACT_DATE FROM MIS.CWC_JSKR_FLOW AL1, MIS.CWC_JSKR_FLOW AL2
WHERE AL1.ESA_CODE = AL2.ESA_CODE AND (1 = 1) ";
DataSet ds = new DataSet("ReportDataSet");
OleDbConnection myOleDbConnection = null;
myOleDbConnection = new OleDbConnection(strConn);
System.Data.OleDb.OleDbDataAdapter da = new OleDbDataAdapter();
OleDbCommand myCommand = new OleDbCommand(sQuery, myOleDbConnection);
myCommand.CommandTimeout = 600;
da.SelectCommand = myCommand;
myOleDbConnection.Open();
da.Fill(ds);
myOleDbConnection.Close();
return new Microsoft.Reporting.WinForms.ReportDataSource("ReportData_CWCR004",
ds.Tables[0]);
}