Thursday, 22 November 2012

Textbox Date validation in javascript

JavaScript Code-

<script language="javascript" type="text/javascript">
    function isDate(txtDate, separator) {
        var aoDate,           // needed for creating array and object
        ms,               // date in milliseconds
        month, day, year; // (integer) month, day and year
        // if separator is not defined then set '/'
        if (separator === undefined) {
            separator = '/';
        }
        // split input date to month, day and year
        aoDate = txtDate.split(separator);
        // array length should be exactly 3 (no more no less)
        if (aoDate.length !== 3) {
            return false;
        }
        // define month, day and year from array (expected format is m/d/yyyy)
        // subtraction will cast variables to integer implicitly
        month = aoDate[1] - 1; // because months in JS start from 0
        day = aoDate[0] - 0;
        year = aoDate[2] - 0;
        // test year range
        if (year < 1000 || year > 3000) {
            return false;
        }
        // convert input date to milliseconds
        ms = (new Date(year, month, day)).getTime();
        // initialize Date() object from milliseconds (reuse aoDate variable)
        aoDate = new Date();
        aoDate.setTime(ms);
        // compare input date and parts from Date() object
        // if difference exists then input date is not valid
        if (aoDate.getFullYear() !== year ||
        aoDate.getMonth() !== month ||
        aoDate.getDate() !== day) {
            return false;
        }
        // date is OK, return true
        return true;
    }
    function checkDate() {
        // define date string to test
        var dt = document.getElementById('<%=TxtDate.ClientID %>');
        var txtDate = document.getElementById('<%=TxtDate.ClientID %>').value;
        // check date and print message
        if (isDate(txtDate)) {
            return true;
        }
        else {
            alert('Invalid date format!');
            dt.value = "";
            dt.focus();
            return false;
        }
    }
</script>

<asp:TextBox ID="TxtDate" runat="server"OnChange="checkDate();"></asp:TextBox>

Thursday, 4 October 2012

Dot net interview questions

http://dotnetfry.blogspot.in/2012/01/dot-net-interview-questions-for-3-years.html

Recursive query in sqlserver 2008

--CBY-SANJAY KUMAR ACHARYA
--CDATE-04 OCTOBER,2012
--exec SP_BI_FetchSubhandleby 12051
create procedure SP_BI_FetchSubhandleby
@Handleby int
as
BEGIN
    WITH SubhandleBy (em_emid, em_name,em_rprto,ds_desc)
        AS
        (           
            SELECT a.em_emid,a.em_name,a.em_rprto,b.ds_desc
            FROM EMPMAST a           
            INNER JOIN DESGMAST b ON b.ds_dsid=a.em_dsid
            WHERE a.em_emid=@Handleby AND a.em_status<>'D'
            UNION ALL
            -- Recursive member definition
            SELECT a.em_emid,a.em_name,a.em_rprto,b.ds_desc
            FROM EMPMAST a
            INNER JOIN DESGMAST b ON b.ds_dsid=a.em_dsid
            INNER JOIN SubhandleBy AS SB
            ON a.em_rprto = SB.em_emid
            WHERE a.em_status<>'D' AND a.em_emid<>a.em_rprto
        )
   
        SELECT DISTINCT
        em_emid EmployeeId,
        em_name+' ('+ CONVERT(VARCHAR,em_emid)+')',
        em_rprto ReportTo
        FROM
        SubhandleBy WHERE em_emid NOT IN(1,2,3)
        ORDER BY em_rprto
END
       

Tuesday, 18 September 2012

View pdf file in asp.net web page in pdf format

<html xmlns="http://www.w3.org/1999/xhtml">
<head>
    <title>Untitled Page</title>
</head>
<body>
<iframe src="EXCEL/Introduction to WCF.pdf" type='application/pdf' width='949' height='600px' ></iframe>
</body>
</html>

Image-:


Saturday, 1 September 2012

Step by Step Guide to Create a Setup for a Web Application


Deployment of an application is big issue in application software development. Normally you have to check each and every possible scenario before deploying your application so that your current deployment doesn't affect the existing application.

Through Microsoft Visual studio .NET we can do it in a better way.

In this article I would like to discuss about creating a setup project for a web application.
Let us discuss step-by-step process of creating installer for a web application. In this article I am mainly concentrating on Setup project. You can follow same steps for creating installer for any complicated project. 
Step I:
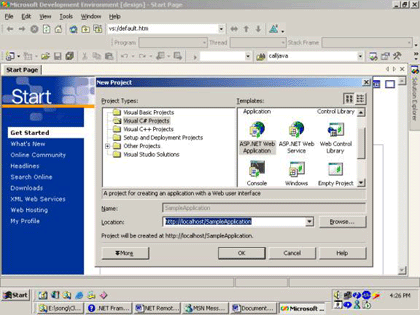
Create a Simple web application using Microsoft Visual Studio .NET


Step II: 
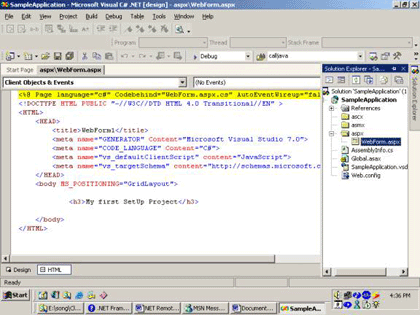
Create a Simple WebForm in the web project. You can also add some more Webform or other control in this project by creating separate directory or in same directory.


Step III:
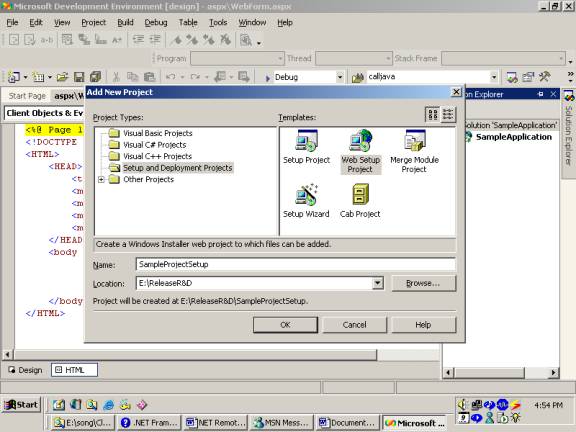
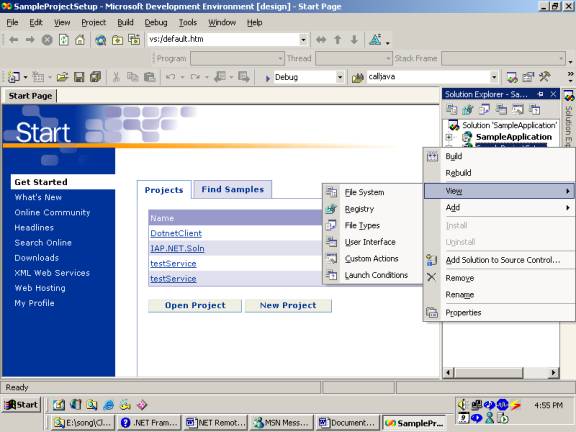
Select Setup and Deployment Projects and than select Web Setup Project also specify the Location and name of your project. 

After creating setup project right click on project and than select view, it will show different possible operations, which you can perform with this setup project. 

These options are
  • File System
  • Registry
  • File Types
  • User interfaces
  • Custom Actions
  • Launch conditions 
Step IV:
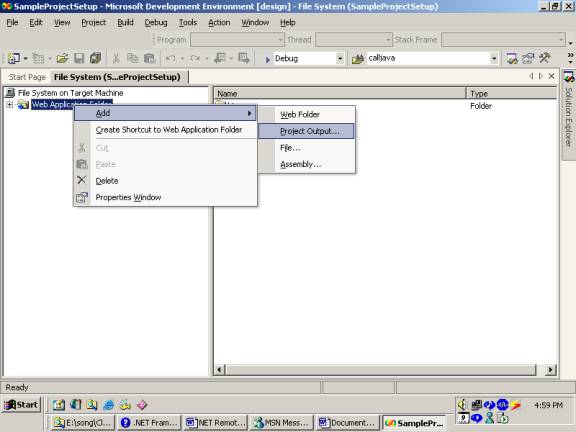
Select File system, it is use to create file system on the target machine. Through this you can specify what details you want to provide at the target machine.
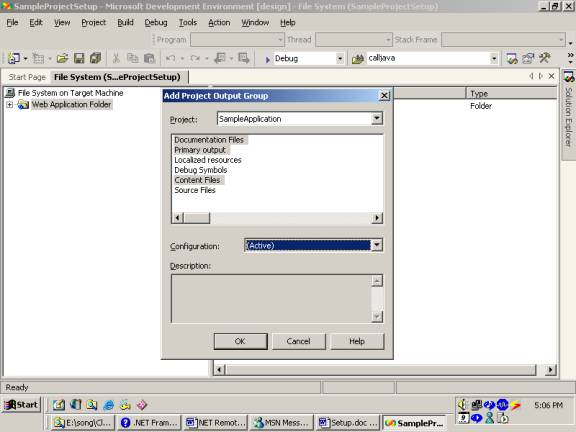
For providing right click on web application project than select add it will display certain option out of that select project output. After that select all details you want to supply for target machine. 

 
Step V:

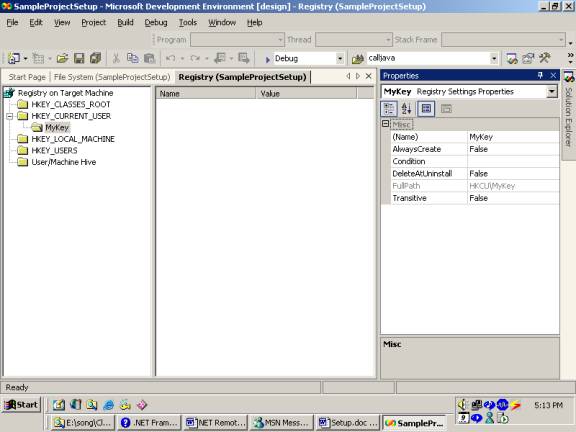
Second Selection is Registry Selection in this selection you can specify the dll, which you want to install at client registry. For that you have to create exact structure of registry in the registry folder structure and then you can specify the required dll for installation in that structure.

You can create new folder by right clicking on that folder and than select new key and define key Name. Each key is associated with a property window where you can specify which dll you want to install in the registry. 

Step VI:          
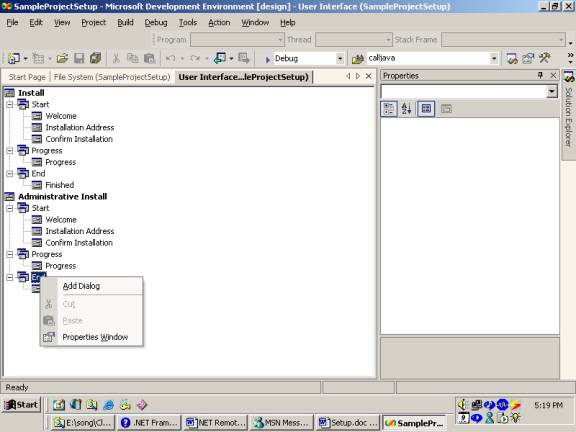
Select User Interface from the view in this selection you can specify what are the screens you want to display during installation process. You can change it, remove it or you can define new screen by right clicking on the screen header. 

Step VIII: 
Select Launch Conditions through this condition you can specify your criteria, which are prerequisite for your application installation. 

Step IX:
Now final step is compile the setup project. After compilation you will notice that it has generated SampleProjectSetup.msi at applications bin/debug folder. 
You can supply this msi the target machine, when you run this msi at target machine it will create a virtual directory as well as create same folder structure, which you have specified in File System. This installer will also install the specified those libraries in the registry which are specified in the Registry. 
Now you can browse that application at the target machine in same way as you have done at your own machine.